

How to Contour & Highlight: Makeup for Beginners

Contouring is a lot like exercising. You might not always have the energy to do it, but once it’s done the results are so rewarding. The key is to darken and brighten specific areas of your face to create a sculpted, more defined look. Where you place each product when you contour completely depends on the shape of your features, which can be tricky for some. Here’s everything you need to know about the power of contour:
The key difference between contour and bronzer is that contour adds a shadow-like feature to your face while bronzer adds warmth. While they are not the same thing, they’re both important parts of the overall process. Some people use them interchangeably while others layer them together. There’s really no rule.
The trick is to find a product that works for you. I recommend cream contour/bronzer because they blend easily and give a natural-looking finish. Some of my favorites are by Milk Makeup, NYX, Charlotte Tilbury and of course, Sacred Child Beauty. (SCB’s bronzer is formulated with synthetic Mica to give it that signature shimmer. It costs more to produce, but eliminates the need for natural Mica- which we refrain from using because it is difficult to be sure it is not sourced from mines that enforce child labor.)
Contouring your forehead can make it appear smaller when done correctly. Simply drag your product of choice along your hairline and use a brush or beauty blender to even it around your temples and into your hairline. This should create that shadow effect.
The first step is to navigate the hollows of your cheeks. Suck in your cheeks and locate the indentation just below your cheekbones. Then, draw a diagonal line where you see this indentation and stop about two or three inches from your mouth. Finally, blend upwards toward your hairline for a lifted effect.
Apply the contour along your jawline from the base of your earlobe to just before the point of your chin and blend downward. It’s as simple as that!
Apply two symmetrical lines on either side of your nose where you would like it to thin out. Add some concealer or highlighter along the bridge of your nose to separate the two lines. Start by blending the highlighter and then the contour. You always want to go from the lightest to the darkest product.
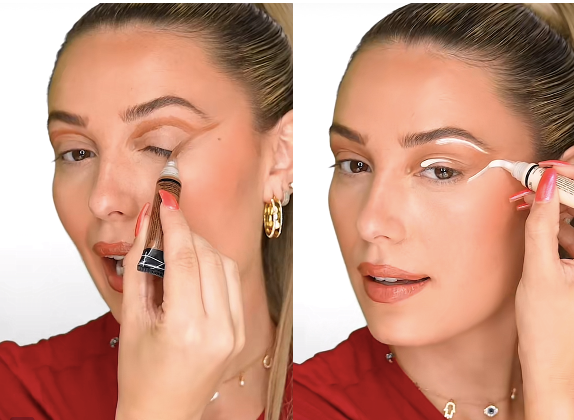
For this step, grab your favorite bronzer and a concealer 1-2 shades lighter than your natural skin tone. Drag the bronzer from the outside corner of your eye about two inches upward and another swoop in the crease like creator, Victoria Lyn demonstrates. After blending that out, swipe concealer under your brow bone, across your lid, and under the bronzer wing you just created. This will give your eyes that “lifted” look.
Remember readers, no rules here! Some people apply their contour, highlighter, and blush at once while others take it step by step. It’s simply about finding what practice works best for you and mastering it. When in doubt, blend it out!
Video Tutorials: Charlotte Tilbury Snatched, Eye Lift


Leave a comment